Nulla Protein Bars
Try Them Today
Try Them Today

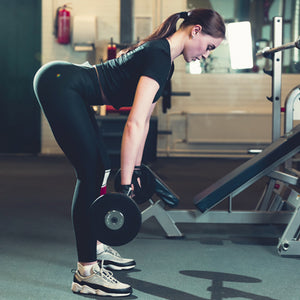
When I started competing, deadlift had always been my strongest lift. Although I was unaware of the mechanical advantages and technical cues to performing the deadlift properly, I was able to pull 700+ in competition. The deadlift starts from the ground up, foot placement, hand placement, core strength, breathing, and upper body positioning.
Before my first competition, I attended a training seminar, where I received the greatest piece of information regarding my set-up. On the deadlift, you want to be as explosive as possible off the floor. Think of your foot positioning when doing so, are they wide, outside of your shoulders? You want to be in a position to jump as high as possible.
You want your foot positioning to be about shoulder-width apart with the bar placement just over the mid-foot. There are two ways to set your feet: straight-ahead or 45-degrees outward. If you choose to set your feet straight ahead, it is important to "grip" your feet into the ground to create torque in your hips.
Once in position, you will begin to activate your entire lower body (priming for an athletic movement), including your glutes. No athletic movements are performed with slow, tight muscles. Michael Jordan never dunked with a super-stiff body.

Article author Rob Merriweather
Before grabbing the bar, as with each of the main lifts, you want to ensure you maintain a tight midsection (abs, oblique's, lower back/spinal erectors). Once you have engaged your lower body, take a few breaths to force all the air down into your core. You want to create as much intra-abdominal pressure as possible to stabilize your spine during the movement.
If you are wearing a belt, the same applies, you will be applying that force against the belt. Belt positioning is all about personal preference, as some tall lifters may have a longer torso, or if you're like me, a shorter torso. I prefer to have my belt on or just above my belly button, so that when I bend down to grab the bar, the belt is not obstructing my position.
I have also learned from other powerlifters who will place the belt just under their sternum. We're all different, find what works best for you and adjust accordingly.
After you have engaged your lower body and tightened your core, it is now time to actually grab the bar. I use a split grip/mixed grip/over-under, meaning one hand is inboard and the other is outboard. I grip the bar just on the inside of the ring knurling. Hand positioning is another comfort/personal preference for some lifters, you may prefer to place them further out or maybe even closer. It is in relation to shoulder-width.
Once you have set your hand placement, you will want to grip the bar by flexing your triceps and squeezing your lats.
Right before pulling, some lifters like to pull the slack out of the bar, meaning before they attempt the lift, they'll pull the bar into the plates, to generate some additional tension before pulling the weight. Everyone is different, you have to find out if grip and rip or pulling the slack out benefits you the most. Most coaches recommend this practice because you can generate more torque off the bar.
At the start of the lift, your hips and shoulders should be rising at roughly the same rate. You are driving your feet through the floor. Now with being a taller lifter, we tend to have more of the upper body over the bar, so there might be some rounding of our shoulders, especially as the weight gets heavier.
A mechanical advantage to being taller is having longer arms, so we don't have to bend down as far to pick up the bar and depending on how tall you are, the distance to the lockout is sometime equivalent to that of a shorter lifter.
One keys point to prevent injury is to maintain a tight core by locking in your lats, keeping an upright chest, and focusing on driving your feet through the floor, pulling the bar into you.
In my experience, there are two accessory variations that have aided tremendously in building the deadlift. Deficit deadlifts and rack (pin) pulls.
Deficit deadlifts assist in developing strength and speed off the floor, while rack pulls aid in lockout strength, two areas where lifters have the most trouble regardless of physical build.
Building speed and strength off the floor is critical to a solid deadlift. With the deficit deadlift, there are additional tools that can be added in (bands and chains) to help assist but for all intents and purpose, I'll cover the bare bones of the lift.
The deficit in which you choose to pull from can range from 1'' to 4", you can utilize whatever you have access to, from 45lb plates to mats to wooden boxes. The increased range of motion recruits more of the posterior chain and quads.
So by being at a slight biomechanical disadvantage, you'll see strength increases throughout your deadlift, which can improve your ability to move the bar off the ground.
Maintaining proper lumbar posture while lifting from a deficit is vital to reducing risks of lower back issues caused from being in a disadvantageous position. The primary issues a lot of tall lifters run into is mobility and being able to get their hips into position and maintain a neutral spine.
Before attempting to load heavy weight on the bar, assess what the optimal depth range for you to pull without sacrificing form. If you're new to training or this exercise is new to your regiment, I recommend starting at a 1" deficit and working up over time. Begin with very light weights!