
NEW NULLA BAR FLAVORS
In-Stock Now!

Last Updated: October 30, 2026
Quick Summary
Shoulder injury prevention depends mostly on your training program, with gear serving as a support tool rather than a fix. Light resistance bands for warm-ups and rotator-cuff work are the most practical starting point, and a compression sleeve or stabilizing brace can add feedback on heavy days. No brace can stabilize an overloaded joint, so treat persistent pain as a signal to get checked.
Shoulder injuries are among the most common problems lifters and CrossFit athletes deal with. One study cited in the research found that shoulder injuries made up 25% of CrossFit injuries, ahead of low-back injuries at 14.3% and knee injuries at 13.1% TuffWraps CrossFit injury statistics summary. Most of those injuries come from training volume, poor movement quality and skipped warm-ups, not from a lack of gear.
Here is the honest part. No brace, band or sleeve will fix a shoulder that is overloaded. Gear supports good training habits. It does not replace them. Shoulder prevention starts with the program, and the right equipment helps you carry it out.
Prehab equipment is worth buying when it lets you train the muscles around the shoulder directly. The rotator cuff and scapular stabilizers do most of the work keeping the joint stable under load, and they tend to get neglected in a standard bench and press routine.
Guidance on shoulder injury prevention emphasizes exercise programs and movement practice rather than one required piece of equipment. A 2022 consensus statement says prevention programs are appropriate for athletes at every level 2022 Bern Consensus Statement on shoulder injury prevention. Treat gear as a tool for that program, not a shortcut around it.
Specialized shoulder-training devices are marketed for rotator-cuff work, and some lifters find them useful. The research I reviewed did not include price or outcome comparisons, so judge any device by whether you will actually use it several times a week.
The article points to a few concrete facts about shoulder injury prevention that are easy to scan side by side.
| Fact | Figure or finding | Source or note |
|---|---|---|
| Share of CrossFit injuries that were shoulder | 25% | Cited study, TuffWraps summary |
| Low-back injuries in CrossFit | 14.3% | Same cited study |
| Knee injuries in CrossFit | 13.1% | Same cited study |
| Prevention guidance | Exercise programs over one required device | Movement practice matters most |
| Consensus statement year | 2022 | Bern Consensus Statement |
| Recommended warm-up frequency | At least once a week | Stretching, mobility, balance (2022 review) |
Bands are the cheapest and most practical prehab tool you can own. A light band handles pull-aparts, external rotations and band-assisted overhead work. Keep it at your gym bag or near the squat rack so it gets used every session.
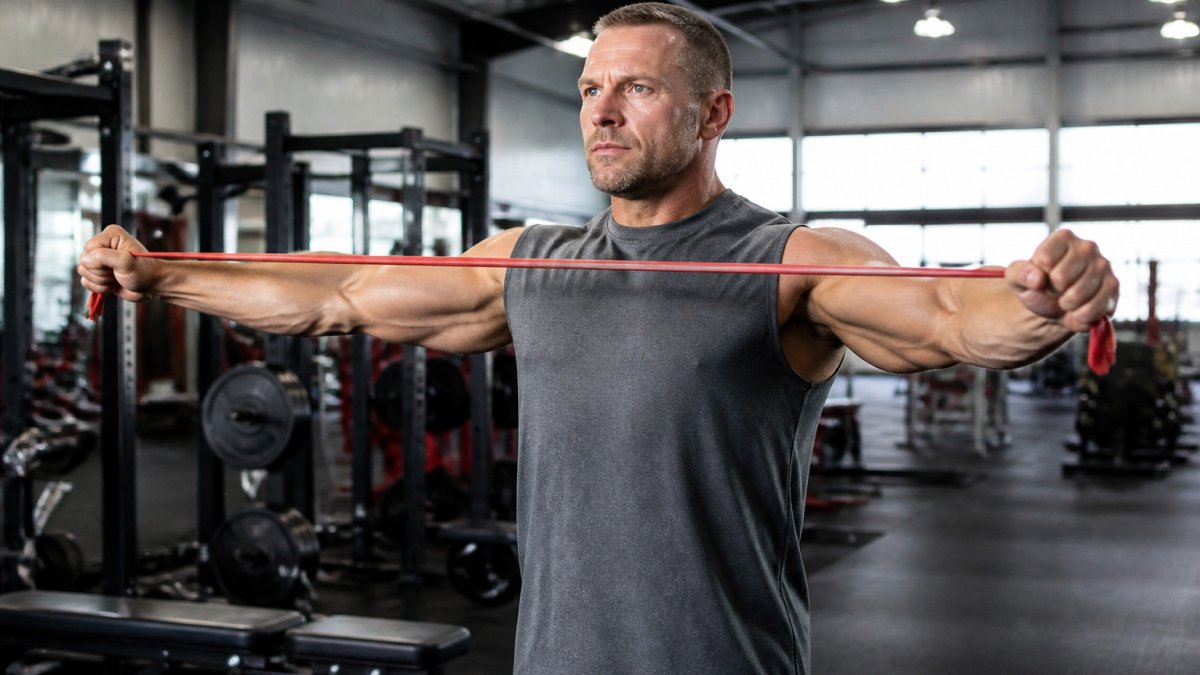
A warm-up that includes stretching, mobility and balance work done at least once a week is a reasonable starting point, according to a 2022 review of common sports shoulder injuries Diagnosis, prevention and treatment of common shoulder injuries in sport. Use bands before pressing, not as a substitute for heavy work.
Pick a band that lets you complete the movement with clean form for 15 to 20 reps. If you are shaking through the first set, go lighter.
A shoulder brace or sleeve can add feedback and a sense of support during heavy pressing or overhead work. It will not stabilize a joint that is already unstable, and it should never be used to hide pain. That is the honest ceiling on what a brace does.
Here is the comparison most guides skip. There are three broad categories of shoulder support, and they do different jobs:
What the research does and does not show: the prevention literature emphasizes exercise programs and movement practice over any single piece of equipment, and a 2022 consensus statement says prevention programs are appropriate for athletes at every level 2022 Bern Consensus Statement on shoulder injury prevention. Braces are not a substitute for that work. Most practitioners find that a brace helps most when it is used as a reminder to keep position, not as a crutch to push through pain.
What matters most is how it fits. A brace that rolls, pinches or restricts your range of motion will cause problems of its own. Try the movements you do most often before you commit to daily use.
Cwench Hydration Team Bottle →
Measure according to the manufacturer's sizing chart, not your usual shirt size. Put it on before every session and check that you can still lift your arm fully overhead and reach behind your back without pain or pinching.
A few concrete fit checks:
Use the brace for support during training and take it off during rest periods to let the joint move freely. If you find yourself reaching for the brace every session just to get through warm-ups, that is a signal to back off the load and get the shoulder checked, not to buy a heavier-duty brace.
You do not need a full rack of equipment to build better shoulders. Start with three exercises and do them consistently.
Keep the weight honest and the reps clean.
Your gear should match what you actually do and whether your shoulder is healthy or already compromised. Here is how to sort it out.
These are not the same job, and the gear is not the same.
Gear cannot diagnose or treat any of these. If you see them, put the brace down and get assessed:
Here is a simple kit: a light and medium resistance band, a shoulder brace you have tried on and sized properly, and a set of dumbbells for controlled pressing. Add a lifting glove if grip comfort is an issue.
Start this week. Warm up with bands for 5 to 10 minutes before every upper body session. Add external rotations twice a week. Track how your shoulders feel the next morning.
Use Free Tools & Fitness Calculators to set training loads and track progress, and check the free workout plans when you need a warm-up structure to follow.
The gear that helps most is the gear that trains the muscles around the shoulder blade and rotator cuff. Resistance bands for warm-ups and light band work are the simplest starting point. A supportive shoulder brace can help some lifters feel more secure during heavy pressing, but it does not replace strength or technique. The research supports exercise based prevention programs for athletes at every level, so treat gear as a tool that supports a warm-up routine, not as a substitute for one.
There is no solid evidence that a brace prevents shoulder injuries on its own. A brace may give some lifters a sense of added support during heavy overhead or pressing work, and some lifters find it useful during a return to training. What the evidence does support is a prevention program built on stretching, mobility and balance work done regularly during warm-up. Use a brace to support good form, never to cover for weak shoulders or a load you cannot control.
Start with mobility work for the shoulder joint and upper back, then move into light band exercises such as pull-aparts and external rotations. Follow that with a few sets of your first lift at light weight, building up gradually. A warm-up that takes ten to fifteen minutes is enough for most lifters. Consistency matters more than any single piece of equipment, so repeat the routine before every upper-body session.
Stop any movement that causes sharp pain, pain that changes how you move, or pain that lingers into the next day. Mild muscle soreness after a new routine is common, but joint pain, weakness, or a loss of range of motion is not something to train through. If symptoms persist or keep returning, book an evaluation with a qualified physical therapist or sports medicine professional rather than trying to push through it with more gear or heavier loads.
{"one"=>"Select 2 or 3 items to compare", "other"=>"{{ count }} of 3 items selected"}




Leave a comment